
How to Trigger a Workflow from a Button or Link in Your Email
Triggering a workflow (automation) from a button or link in your email is a powerful feature that lets you take actions based on user behaviour. The most common use case is to initiate an opt-in workflow when a recipient clicks a link — but it can go far beyond that.
You can use this function to send follow-up emails, update subscriber data, or even segment users into different journeys. Below is a step-by-step guide on how to set this up in BulkMail.
Step 1 – Create an Email Template
Start by ensuring you have an email template ready that will be used in the automation workflow. Make sure the template name is clearly recognisable, as you'll need to select it later when configuring your automation.
This template will be used as the email that gets sent once the workflow is triggered.
Step 2 – Create a New List
Next, set up a dedicated list that will be associated with your automation. Although you can reuse an existing list, it is best practice to create a separate list specifically for this purpose. This helps with segmentation and lifecycle tracking.
This list will act as a container for users who interact with the link or button, helping you isolate them for reporting or future targeting.
Step 3 – Create an Automation Workflow
In this step, you will build the actual workflow logic. Your workflow should contain the following actions:
Start Point (Required)
Every automation must begin with a start point. This defines how the workflow is initiated. In this case, it will be linked to a user's interaction with a link or button.
Action: Email Preferences
Choose the list you created in Step 2 here. You can configure additional settings such as tags, preferences, or segmentation depending on how you want to manage subscribers.
Action: Email
Select the template you created in Step 1. This is the email that will be automatically sent to users once they trigger the workflow.
End Point (Required)
Finish your workflow with an end point. This ensures the automation is complete and the system recognises the workflow's final action.
Once all elements are in place, save and activate the workflow.
Step 4 – Edit the Sending Template or Newsletter
Now it's time to link everything together using a clickable element in your campaign.
There are two ways to trigger the automation:
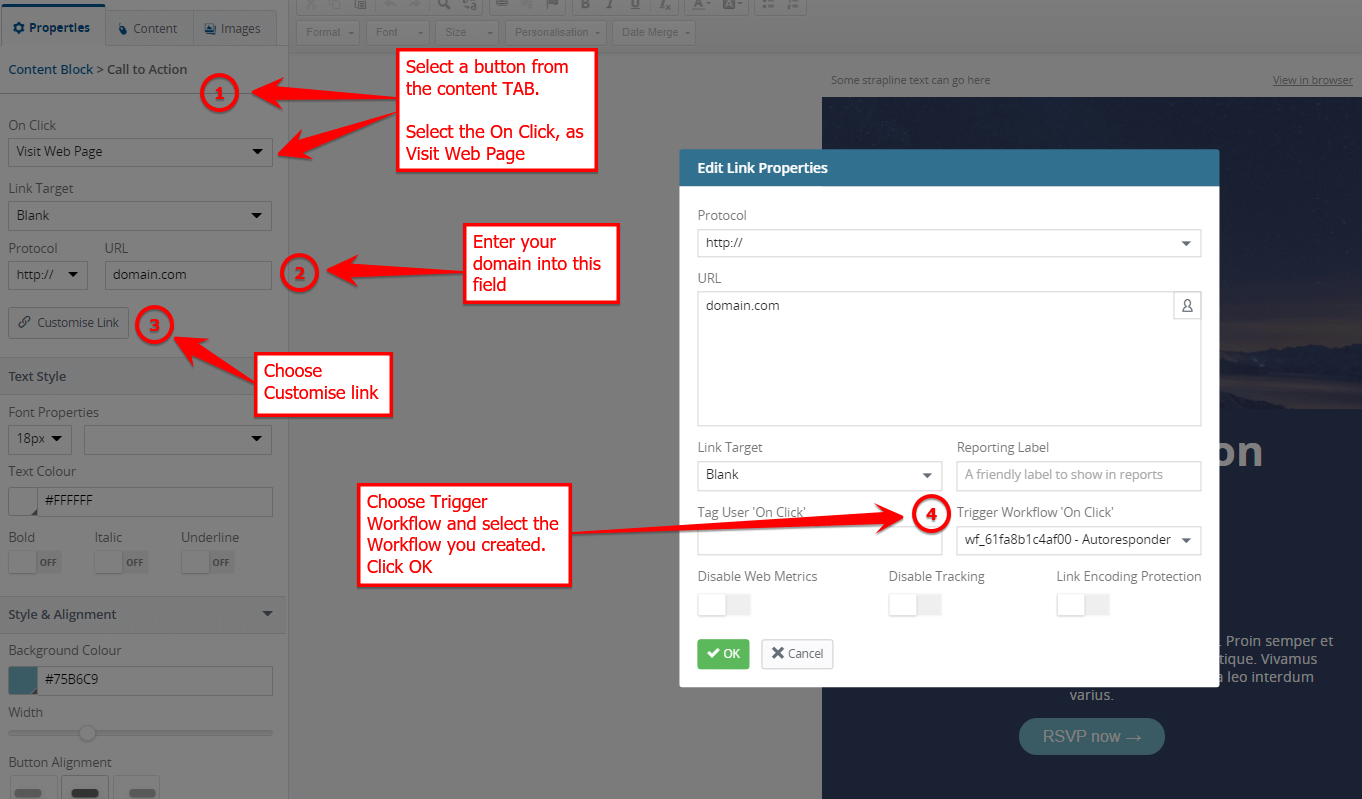
Option A: Add a Button
- Insert a button into your email content.
- In the button settings, choose the action that associates the click with the automation list you created in Step 2.
- Link the button to the correct automation action or URL trigger.
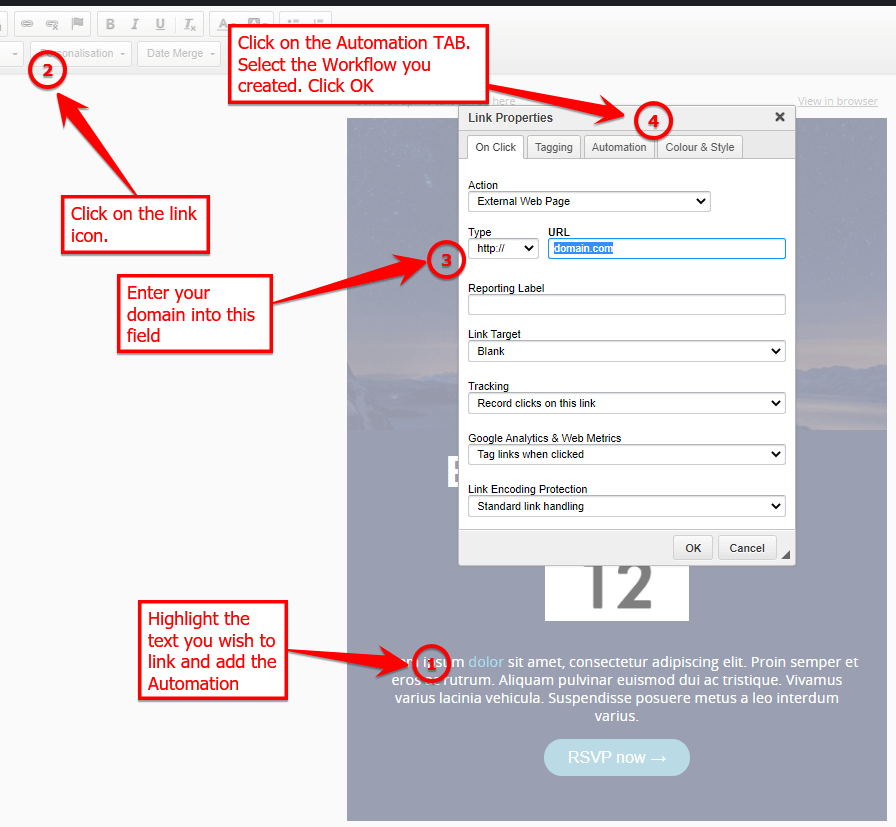
Option B: Add a Text Link
- Highlight text within the email content and create a hyperlink.
- Use the same process as the button — link it to the correct action to trigger the workflow.
Once you're happy with the configuration, save the template.
Final Note
This method allows you to build smart, interaction-driven automations based on actual user behaviour. While the most common use case is for opt-ins, you're free to configure workflows that deliver educational content, upsells, reminders, or follow-ups — all based on a single click.
Your automation strategy starts with good planning and clear structure. Follow the steps above to make sure your campaigns not only look good, but also perform with purpose.
Let me know if you'd like me to format another guide this way.